Filtering Both Chromebook and Non-Chromebook Device Users
The solutions provided are described in isolation to each other. It's viable to have a combination of Connect for Chromebooks and SSL / non-SSL login pages for authentication:
If your Connect for Chromebooks solution uses Google verification, do the following to use SSL / non-SSL login pages as well:
- On the SERVICES menu, under the Authentication submenu, click Google.
- Under the Google settings section, select Google Sign-In button.
- Click Save changes.
Connect for Chromebooks uses HTTPS to communicate with Google's OAuth servers. This is suitable for SSL login pages, and you don't need to do any further configuration.
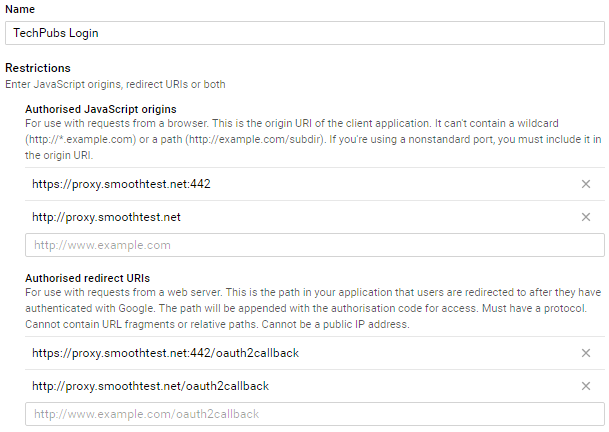
However, if you want to make use of non-SSL login pages (for authentication over HTTP), add the following to the web application you created in the Google API Console, see our knowledge base article, Creating the Client ID and Client Secret from for Google Authentication :
- For both Authorized JavaScript origins and Authorized redirect URIs, add a HTTP version of the Smoothwall Filter and Firewall hardware appliance host name without the port number, for example, http://proxy.smoothwall.com
Your web application's Restrictions should resemble:
Connect for Chromebooks solution trusts the users' Google G Suite domain credentials
Do the following to use SSL / non-SSL login pages:
WARNING: By turning on Validate user identity, you're changing the behavior of the Connect for Chromebooks extension from trusting to verifying. We recommend that you make your users aware of this. Especially because they'll need to sign-in.
- To create a Client ID and Client Secret, see our knowledge base article, Creating the Client ID and Client Secret from for Google Authentication .
- If you want to use both SSL pages, for authentication over HTTPS and non-SSL pages for authentication over HTTP, enter both HTTPS and HTTP versions of the Smoothwall Filter and Firewall hardware appliance's host name in Authorized JavaScript origins and Authorized redirect URIs:
- To use SSL pages, for authentication over HTTPS, use the HTTPS version.
- To use non-SSL pages for authentication over HTTP, use the HTTP version.
Note: The HTTP version doesn't need the port number.
- On the SERVICES menu, under the Authentication submenu, click Google.
- Under the Google settings section, select Google Sign-In button.
- Select Validate user identity.
- Two new parameters appear. Enter the Client ID and Client secret created in step 1.
- Customize the sign-in page.
- Click Save changes.
If you don't have Connect for Chromebooks or SSL or non-SSL login authentication pages setup, we recommend that you configure Connect for Chromebooks using Google verification first, including setting up all additional configuration, then turn on SSL or non-SSL sign-in pages. This way, you have all relevant filtering policies in place. First to catch any users who might access content while you're still setting up.